> ## Documentation Index
> Fetch the complete documentation index at: https://mainwp-mintlify-b66ccbcf.mintlify.site/llms.txt
> Use this file to discover all available pages before exploring further.
# Manage Clients
> Learn how to create and manage clients in your MainWP Dashboard. This guide covers adding new clients, editing client information, assigning sites to clients, and managing client-specific settings.
The Clients feature lets you organize your child sites by client, track client information, and generate client-specific reports. Assign sites to clients, store contact details, create custom fields for additional data, and use the Client Card to view a consolidated overview of each client's sites and activity.
## What You'll Accomplish
* Create and manage client records
* Import multiple clients with CSV
* Assign child sites to clients
* Customize the client table display
* Use the Client Card for client overview
* Create custom client fields for Pro Reports
## Prerequisites
* MainWP Dashboard installed and activated
* Child sites connected to your Dashboard
* Pro Reports extension (optional, for client reporting)
***
***
## Create a New Client
Go to **Clients > Add Client**.
Fill in the client name (required) and other desired fields.
In the sidebar on the right, select child sites to assign to this client.
Click **Add Client**.
The Client Email field supports multiple email addresses separated by commas: `email1@example.com, email2@example.com`. Pro Reports uses the `[client.email]` token for the **Send email to** field.
***
## Import Clients (CSV)
Import multiple clients in one run by uploading a CSV file.
Go to **Clients > Import Clients**.
Click **Download Sample** to get the required CSV structure.
Keep the same column order used in the sample file. For **Select sites**, separate multiple site URLs with semicolons (`;`).
Upload your `.csv` file, keep **CSV file contains a header** enabled when row 1 is a header, and click **Import Clients**.
Watch the row-by-row log in the import modal. Fix failed rows, then import again.
### CSV Columns and Formats
| Column | Required | Format |
| ---------------- | -------- | --------------------------------------------------------------- |
| Client Name | Yes | Plain text |
| Client email | Yes | Email address |
| Client address 1 | No | Plain text |
| Client address 2 | No | Plain text |
| Client city | No | Plain text |
| Client state | No | Plain text |
| Client ZIP | No | Plain text |
| Client country | No | Plain text |
| Client status | No | `0` = Active, `1` = Suspended, `2` = Lead, `3` = Lost |
| Select sites | No | Zero or more connected site URLs; use `;` between multiple URLs |
Lines starting with `#` are treated as comments and skipped during import.
Rows fail when required fields are missing or when the client email already exists. The required fields are **Client Name** and **Client email**.
### Related
* [Create a New Client](#create-a-new-client) for one-by-one client entry
***
## Update a Client
Go to **Clients > Clients**.
Find the client and click **Edit** from the actions menu.
Make your changes and click **Update Client**.
***
## Delete Clients
### Delete a Single Client
Go to **Clients > Clients**, find the client, and click **Delete** from the actions menu.
### Bulk Delete Clients
Go to **Clients > Clients** and check the boxes next to clients you want to delete.
Select **Delete** from the **Bulk Actions** dropdown and click **Apply**.
***
## Customize the Manage Clients Table
Go to **Clients > Clients** and click the **Page Settings** (cog icon) in the top right.
Set the number of clients to display per page and select which columns to show.
Click **Save Settings**.
***
## Client Card
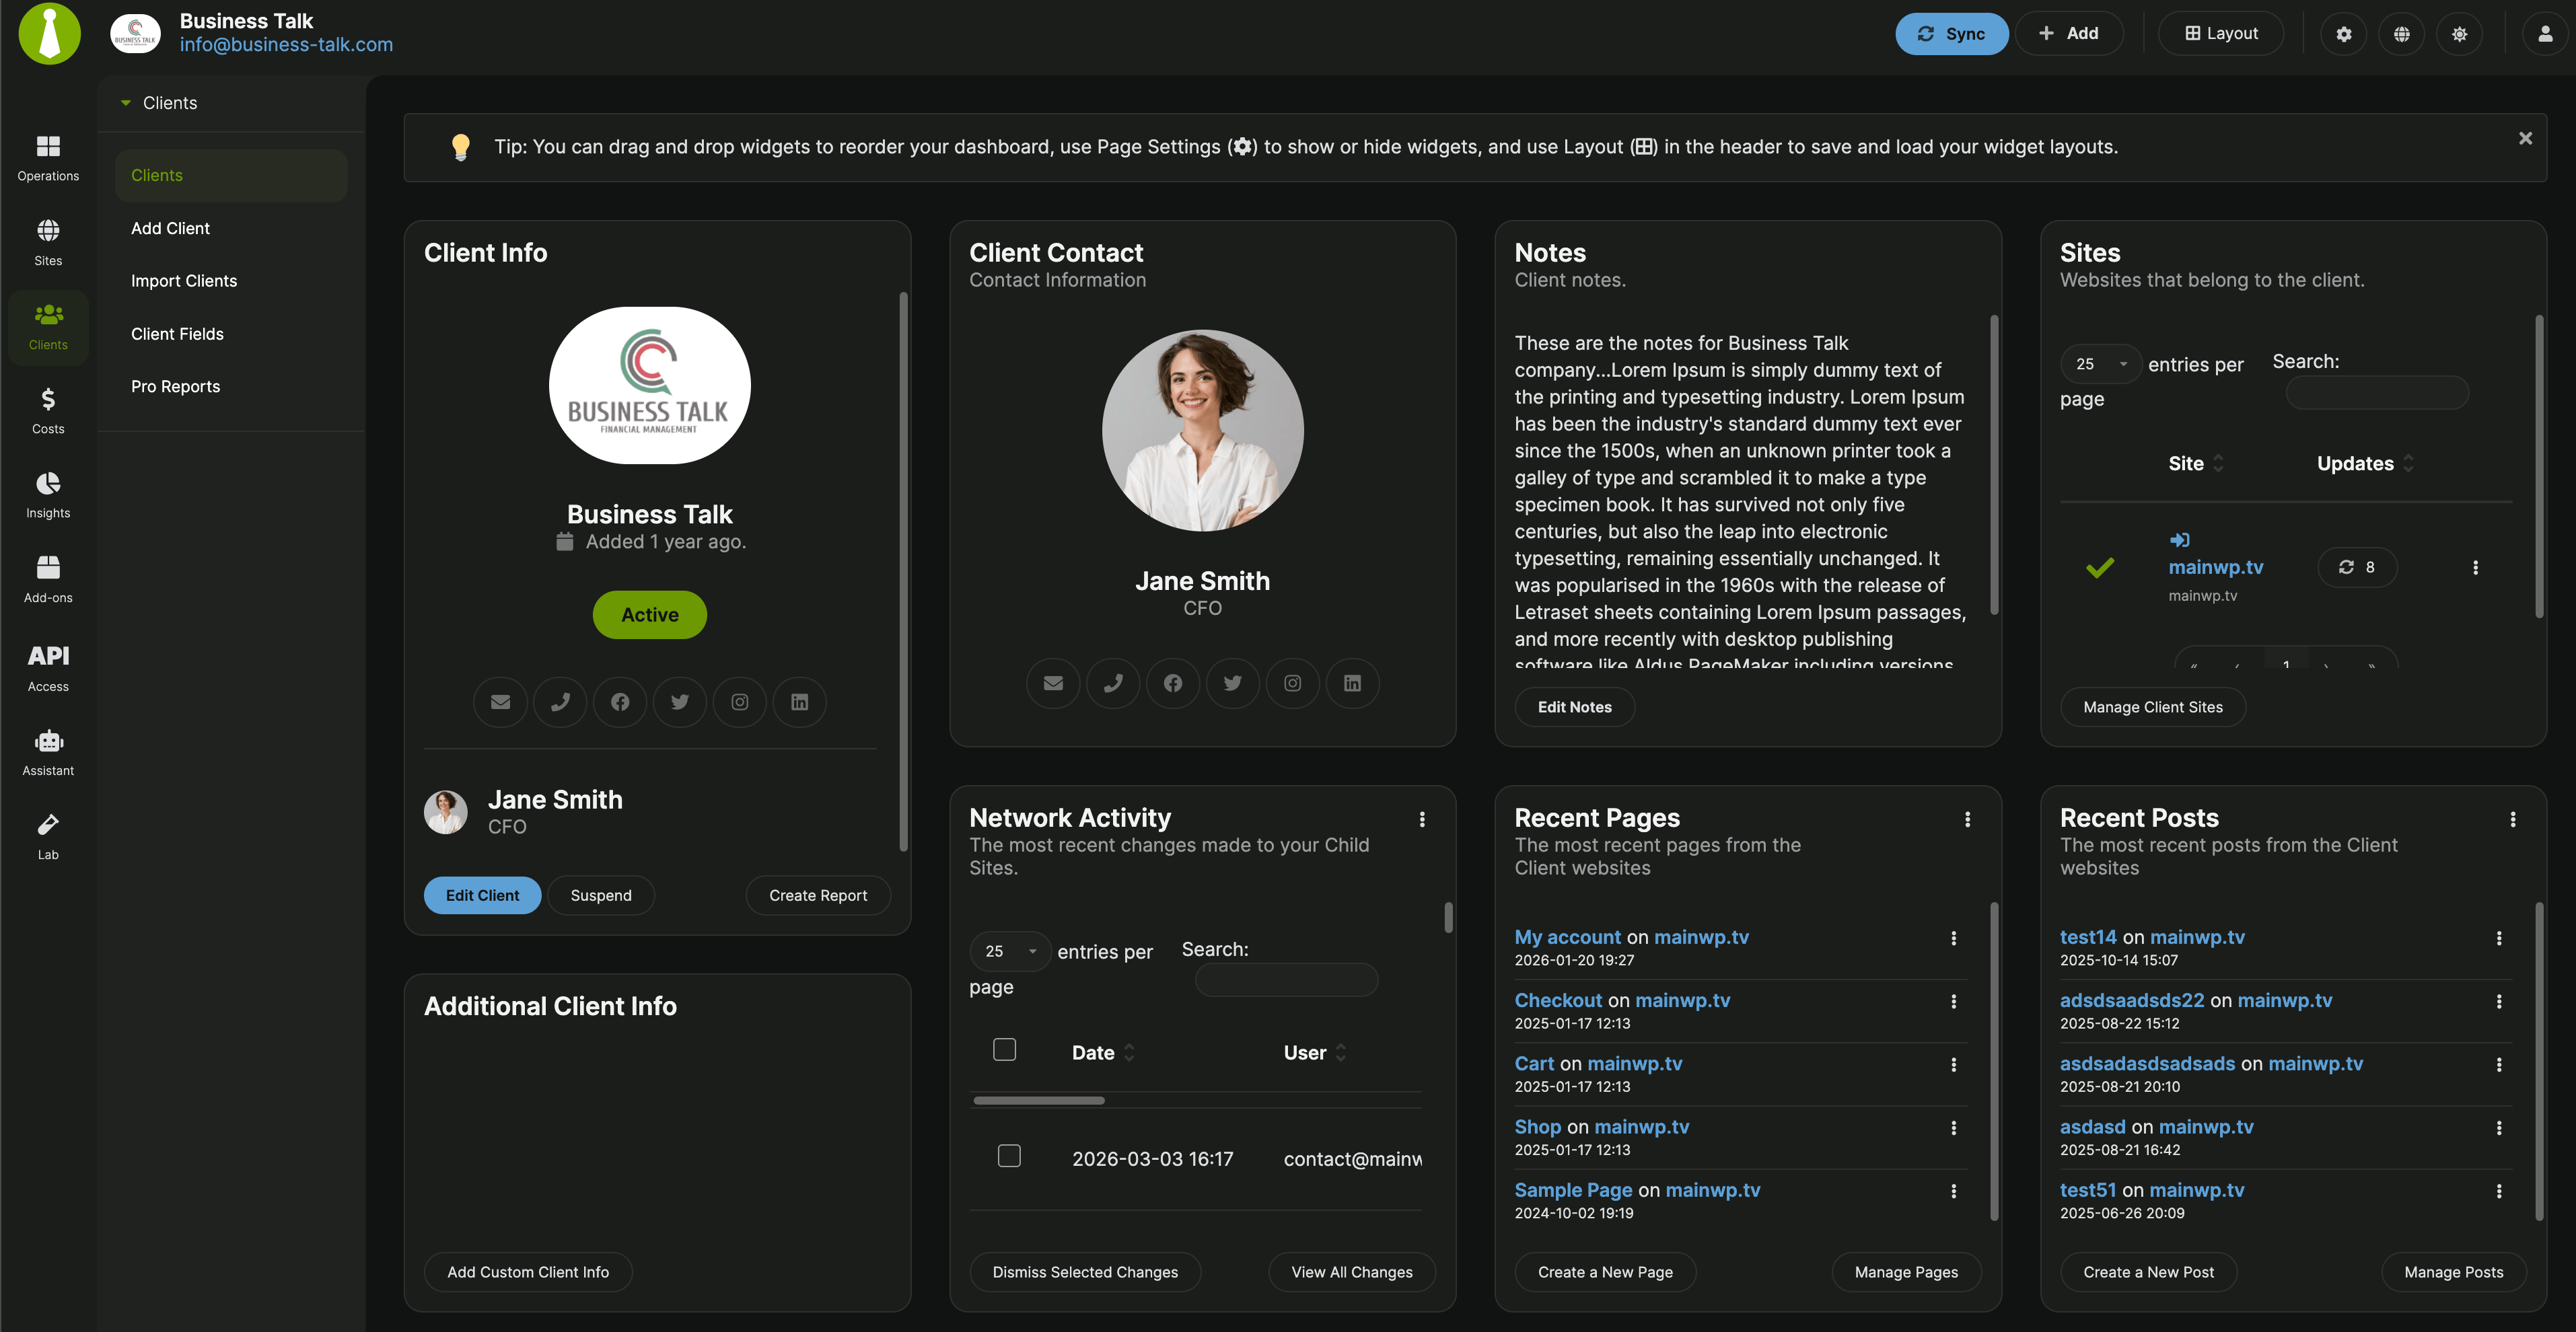
The Client Card displays a consolidated overview of all information for a specific client. Widgets on this page can be resized and rearranged.
### Available Actions
The **Client Info** widget provides these actions:
| Button | Action |
| ------------------- | ---------------------------------------------------------------------------------------------------------------------------------------------------------------------------------------------------------------------------------------------------------------------------- |
| Edit Client | Opens the Edit page for this client |
| Suspend / Unsuspend | Changes the client and all assigned sites between active and suspended. Suspended sites remain connected, but MainWP actions for them are paused. Learn more in [Suspend or Unsuspend a Child Site](/sites/management/manage-child-sites#suspend-or-unsuspend-a-child-site). |
| Create Report | Appears when Pro Reports is active and opens a new report with this client's sites pre-selected |
The **Sites** widget provides **Manage Client Sites**, which opens the Sites page filtered to show only this client's sites.
### Client Overview Widgets
By default, the Client Card includes these widgets:
* **Client Info** - Basic client details, status, and quick contact links
* **Notes** - Internal client notes with an **Add Notes** or **Edit Notes** action
* **Sites** - Child sites assigned to the client
* **Additional Client Info** - Saved custom fields and other extra client details
* **Network Activity** - Recent changes across the client's child sites
* **Recent Posts** - Latest posts from the client's child sites
* **Recent Pages** - Latest pages from the client's child sites
If the client has saved contacts, the Client Card also displays a **Client Contact** widget for each contact.
The screenshot below highlights the activity widgets on the Client Card.
***
## Client Fields
Client Fields let you create custom data fields for storing additional client information. These fields generate tokens that can be used in Pro Reports.
### Add a New Field
Go to **Clients > Client Fields**.
Click **Add Client Field**.
Enter the Field Name (used as a token in Pro Reports) and Description.
Click **Save Field**.
### Edit a Field
Go to **Clients > Client Fields**.
Find the field and click **Edit** from the actions menu.
Make changes and click **Save Field**.
### Delete a Field
Go to **Clients > Client Fields**, find the field, and click **Delete** from the actions menu.
### Use Custom Fields
After creating a field, set its value for each client on their Edit page. The field token can then be used in Pro Reports to display that data.
***
## Self-Check Checklist
* [ ] Client records are created with required information
* [ ] Child sites are assigned to appropriate clients
* [ ] CSV imports create clients and assign sites correctly
* [ ] Client Card displays correct site data
* [ ] Custom fields are created and populated (if needed)
* [ ] Table customization settings are saved
***
## Related Resources
* [Pro Reports Extension](/add-ons/agency/pro-reports-extension-overview) - Generate client reports
* [Available Pro Reports Tokens](/add-ons/agency/available-pro-reports-tokens) - Token reference for reports
 ***
## Client Fields
Client Fields let you create custom data fields for storing additional client information. These fields generate tokens that can be used in Pro Reports.
### Add a New Field
***
## Client Fields
Client Fields let you create custom data fields for storing additional client information. These fields generate tokens that can be used in Pro Reports.
### Add a New Field